Sunday, April 7, 2013

Watercolor Crayons & Pencils Being Discontinued- Get FREE Shipping April6-8th


 One of my favorite techniques is water coloring! I love having so many different w/c mediums to choose from when water coloring. If you have not purchased the pencils or crayons yet....here is your chance to get them before they are all gone and pay NO SHIPPING!
Due to unforeseen problems with our supplier for Watercolor Wonder Crayons and Watercolor Pencils, we have decided to discontinue these two products.
Watercolor Pencils (item 101879) and Watercolor Wonder Crayons Brights Collection (item 119804) are no longer available.
Now for the good news! We still have the remaining collections of the Watercolor Wonder Crayons available to order. The Subtles (item 119802), Neutrals (item 119805), and Regals (item 119803) Collections are only available while supplies last. Get ‘em before they’re gone!
A simple card with a lot of WOW power!
Water coloring is very relaxing and a perfect project for beginner's as well as seasoned stampers. I have found it is always a hit. In this project I used a combination of water color crayons and pencils to color my flowers and using Stampin' Up!'s blender pens just gives it that perfect blend and a dab of dazzling details to add some bling!
DSP: Poetry Print Pack- Cs: Summer Starfruit, Gumball Green, Whisper White,
INK: Raspberry Ripple
Stamps: Apothecary Art #125527(c)$27.95 (w) #125525 $34.95- Loving Thoughts-#125845(c)$23.95
Big Shot: Label Framelits: $26.95#125598
Accessories:3/8" Satin Stitched-Raspberry Ripple $8.95- Blender Pens $9.95 #102300
Remember you can participate in our Mystery Hostess Workshop by placing your order before 10am Monday the 8th! 
Email or call me! Free shipping on any size order!
 Blender Pens - by Stampin' Up!Watercolor Wonder Crayons - Subtles Collection - by Stampin' Up!Watercolor Wonder Crayons - Neutrals Collection - by Stampin' Up!
Watercolor Wonder Crayons - Regals Collection - by Stampin' Up!

Saturday, April 6, 2013

FREE Shipping on Any Stampin' Up! Order-April 6th - the 8th

FREE SHIPPING April 6th - 8th ONLY!  
Email me your order and participate in Mystery Hostess drawing
 for $25.00 in FREE product!
CLICK HERE TO  ORDER! 
 Don't forget to check out the
SPECIALS, BUNDLES & NEW PRODUCTS, too!


Make sure to order your ink refills and card stock
for the retiring colors!
CLICK HERE to view the list of new and retiring colors!

Thursday, April 4, 2013

Stampin' Up! Color Refresh


 Being discontinued
  • Regal Rose
  • Pretty In Pink
  • Bashful Blue
  • Certainly Celery
  • Baja Beeze
  • Riding Hood Red
  • Bravo Burgundy
  • Not Quite Navy
  • More Mustard
  • River Rock
Stock up now on your favorite colors and don't forget to include Ink Refills if you already have the ink pads! Here is a list of the new and returning colors that will be available on June 1st:
  • Bermuda Bay (returning from a few years ago)
  • Calypso Coral (In Color staying)
  • Wisteria Wonder (In Color staying)
  • Pear Pizzazz (returning from last year)
  • Soft Sky
  • Pool Party (In Color staying)
  • Blushing Bride (returning from last year)
  • Crushed Curry (returning from last year)
  • Island Indigo (In Color staying)
  • Smoky Slate
check out the Stampin Up! Videohttp://www.youtube.com/watch?v=gOoCRT0Ux2w&feature=player_embedded

Stampin Up! Color Refresh 


Monday, March 4, 2013

Stampin' Up! Excitng NEWS!!


It's CLEARLY something NEW at Stampin' Up! And I can SEE that we are going to LOVE this new option in our stamping line up!! Here's a quirky/funny video "What's Photopolymer?" that Stampin' Up! demonstrators were treated to this morning: Check out the video here  
view yesterday post here for more details

 And did you know this set is available for ordering today - right here Toss a Paper Pumpkin subscription into your basket while you're there (because they're shipping in March) and another small item or two and you'll qualify for a free item from Sale-a-bration (until the end of the month)

Paper Pumpkin ~ It's a Magical Paper Escape Every Month! 

 Sweep away the mundane-your creativity carriage awaits!


Hi Friends!  Today I am sooooooooo excited to introduce you to 'Paper Pumpkin'!  This is a new program from Stampin' Up!, introduced at their recent Leadership Conference.  I've been bubbling with excitement over it and now I'm ready to share it with you too!  It's a stamping/crafting kit from Stampin' Up! that is sent to your door every month!  Everything is prepared for you - you just assemble.  It's very quick and easy, super fun and each month the project is different and full of crafting bits and bobs for you to create with.  

Want to learn more? 
Of COURSE you do!!!!!!  
Well then read on, my friends! 
 

I'm Paper Pumpkin . . .
I come to your door each month (a fully decked-out creativity carriage). I'll help you to escape your life with some paper fun.
I come in a sweet box, but you'll really love what you find on the inside: All the stamps, ink, paper, and accessories to create pinable projects. Create stuff like cards, journals, décor, and more!


Paper Pumpkin by Stampin' Up! is a new monthly kit program that anyone (even you) can enjoy from the comfort of your own home!
How to Get Your Paper Pumpkin Kit
It's so easy to get started. Simply register for the program just by visiting my online store Every month a new, surprise project kit arrives at your doorstep. Just think of the anticipation of creating a fun project to pin, showoff, and share with your friends and family-every month!

 Your very first Paper Pumpkin 
will arrive on your doorstep 
starting in March
-if you sign up before March 10!

Of course, you'll want to know more. So here's the nitty gritty:
  • Each month Stampin' Up! will send you a unique, surprise kit with a project-cards, journals, décor, and more! (They've even color-coordinated, measured, and cut everything for you!)
  • Each kit includes stamps, ink, paper, and accessories-everything but adhesive.
  • Each kit gives you (and your friends, because they're going to want to subscribe too!) a 30-minute creativity escape.
  • Stampin' Up! will ship your Paper Pumpkin on or around the 15th of the month.  
  • You need to sign up for a kit by the 10th of the month to get that month's kit. If you sign up on the 11th of the month, your first kit will come the next month. (Let's say you sign up on May 10th, Stampin' Up! will send your kit around May 15th. If you sign up on May 11th,  your first kit will be sent around June 15th.)
  • A Paper Pumpkin membership $19.95 per month (and shipping is included!)
  • There's no commitment, you can cancel your monthly Paper Pumpkin at anytime. You can also skip a month if you want.
  • Not sure if you want to subscribe yet?  No problem!  Just get the Try-It kit if you'd like to try Paper Pumpkin for one month.


Starting in early March, you can try Paper Pumpkin for one month by visiting my online store.

Feel Free to call me with any questions and please designate me as your demonstrator to participate in my paper pumpkin club!

Saturday, March 2, 2013


It's CLEARLY something NEW at Stampin' Up! And I can SEE that we are going to LOVE this new option in our stamping line up!! Here's a quirky/funny video "What's Photopolymer?" that Stampin' Up! demonstrators were treated to this morning:
 And so . . . are you ready to see the very first completely clear photopolymer stamp set from Stampin' Up? Well here it is!! All 57 pieces for only $13.95!! I almost feel like fainting! What an AMAZING price! Stampin' Up! recommends that you have the following clear blocks available when you use this set: A, B, G, F and I. You can order it today from Stampin' Up! The number is 132956. Or, just go to my online store here


And, as it is March 1 (only 22 more days to rock out with Sale-a-bration!), Stampin' Up! also revealed the third set of stamps in their "Best Of" series to celebrate Stampin' Up!'s 25 Anniversary. This set is "Best of Flowers." You can see the PDF HERE. Download your Best Of Collector's Card HERE and redeem a free stamp set when collect six "25" stickers.

Thursday, February 14, 2013

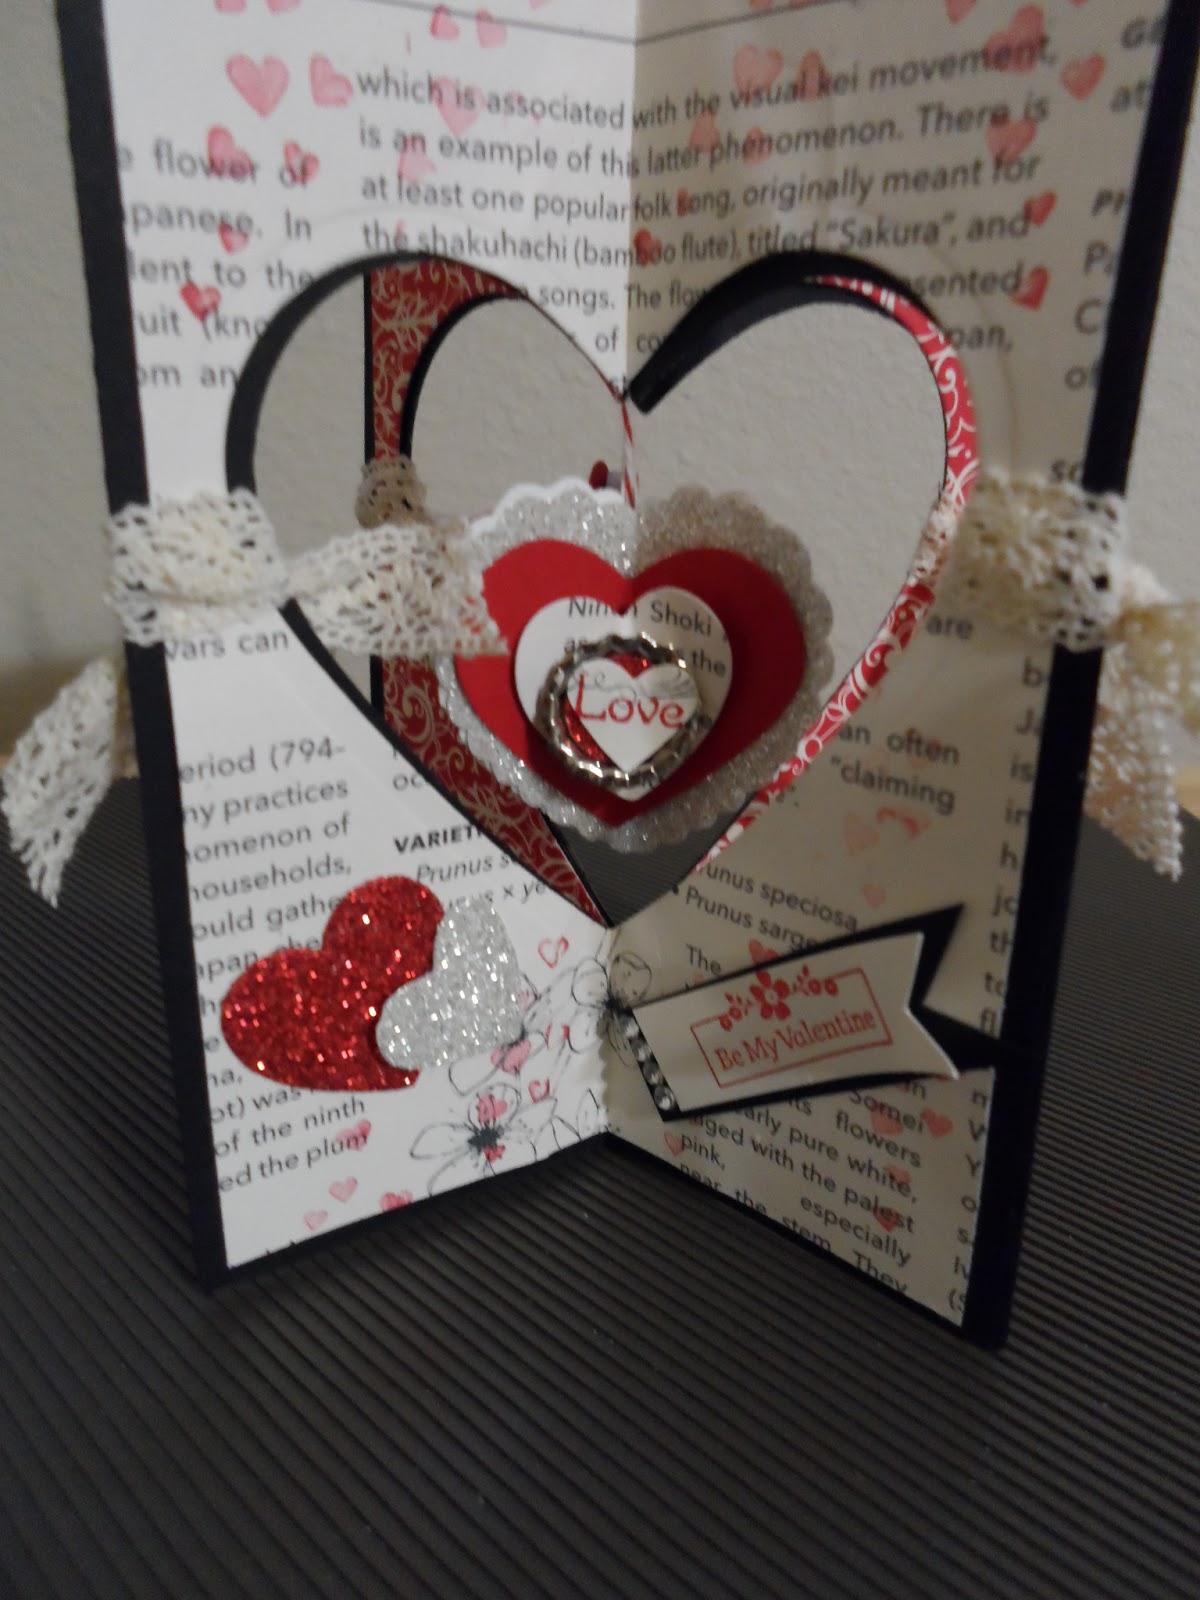
Stampin' Up! Valentine

Happy Valentines Day!
I wanted to share the Valentine I made for my sweetie!
It was so much fun! 
 This is a four heart fold card- I got the directions from Debbie Henderson who so generously shared her version and then this is what I came up with. I am so proud of myself that I was able to keep it from him without showing it to him before Valentines Day!
 I used SU First Edition& Candlelight DSP with Basic Black, Silver Glitter paper, Real REd
Check out the small soda pop tops in the middle of the floating heart. I smashed those and ran them thru the Big Shot. Also used the All a Flutter stamp set and Framelits, with the Heart framelits.
Have I mentioned how much I love the ticket punch now? Also, I used the stamp set Be My Valentine that came in the Valentine kits for the smaller sentiments.

Here are the directions for this cool card!
It's not just for Valentines- check back  for other cool samples I made using the 
By The Tide set and The Oh Whale set.
To create this card, all you need are 4 card stock panels measuring 5 1/2" x 4 1/4". I adhered a piece of DSP to each panel with a different pattern on each measuring 5 3/8 x4". I then scored each panel in the center at 2 1/8" on the 4 1/4" side. Before I folded on each score, I used my "Hearts Collection Framelits" to cut a heart in the center of each panel. In order to make sure all the hearts line up exactly on each panel, I measured an equal distance from the bottom of each panel and marked it with my pencil. I marked mine at 1 ¼ from the bottom on the score line and made sure that the points of the bottom of the heart line up on that point at the bottom and the center point of the heart line up on the score line up top. I made a template and then used that on the remaining 3 panels to mark my point so they would all line up. Tip: Use sticky strip to adhere your panels together.
Once all of your hearts are cut out, fold all 4 panels in half with your "Bone Folder". Adhere the half panels to each other until you get to the last one. Before you adhere the last 2 panels together, insert a piece of ribbon or baker's twine so that it will hang in the center of your card and glue in place. Finally, adhere your last 2 panels together.

If you want to create a floating heart in the center glued to the baker's twine like I did on mine, cut 4 hearts, fold in half and adhere the halves together like you did the card panels.
Embellish as you like. Enjoy. 

Tuesday, February 5, 2013

Oval Dress Form Card

Did you love playing paper dolls when you were little? I did and this new set has brought that love back to paper crafting. There are so many options and fun different ways to decorate your dresses and not to mention card folds you can use with this bundle. Here is a card we made at our last Big Shot class.


Using your Oval FramelitsTip: Number your framelits smallest to largest with a Sharpie Marker. Take the CS that the framelits come adhered to and write down all the measurements on that piece of CS take all Framelits and put them on a jump ring for easy hanging. Plus you will always have your measurements for quick paper cutting for framelits. Cuts down on CS waste!
Directions For Oval Framelits Card:
·         Take Oval #7 ( largest one with scallops) Use Coral CS 5 ½  x 8 ½  fold in half
·         Line up the framelit on the top of Tab 2 and your acrylic/platform and leave a few scallops exposed on the FOLDED side to cut a folded oval card. Paper pierce the top of scalloped oval.
·         Take Oval # 6 ( Cut Artichoke DSP and Tea for Two DSP both at the same time then cut them in half and use one of each end to make your second layer of oval. Put trim ribbon over the middle. Use snail no Dimensionals.
·         Take Oval Framelit # 4 Cut Sand CS for next layer oval .Use Dimensionals on this oval
·         Then you work on your dress. Stamp the Dress image from the All Dressed Up stamp set in coral onto vanilla CS and cut it out with the coordinating framelit and adhere to the top of the sand oval. I used a rosette from the flower trim and colored it with my aqua painter with coral ink added a little belt with 1/8 inch taffeta vanilla ribbon and a few pearls for the necklace. I also used the sentiment from the stamp set Vintage Verses which you can earn for FREE with any $50.00 purchase from the sale-a-bration flyer.


 All Dressed Up Bundle Clear
 
All Dressed Up Bundle Clear
131095
Price: $34.95
All Dressed Up Stamp Set and Dress Up Framelits Dies--buy as a bundle and save 15%.

·         Stamp Dress image in calypso coral ink on the vanilla CS and cut out with the coordinating dress framelit. Then run thru the polka dot efolder. Use the Espresso CS to cut out the Dress Form base.
·         Adhere the dress to the espresso dress form base using snail on the middle of the dress form and a tad on the shoulders. Do not put the adhesive on the stamped dress. Then use Dimensionals to put the dress form on the sand oval